Raspberry Pi Device Discovery
Before you begin, ensure you have a method of developing on your PI (either remotely or locally). I am doing my development on windows so here is the tutorial I followed to setup a shared drive
http://blogs.arcsoftwareconsultancy.com/pi/2013/03/07/windows-networking/
Now onto the code!
Device discovery is a pretty common way to identify multiple devices within a local network. It is not the best way but definitely a great place to start.
The idea of this code is that a PC will broadcast a UDP message with the datagram “request” and all PI’s listening will response with a UDP packet of their own with a datagram of “PI”.
Below is the C++ code for the PI (Qt GUI Application)
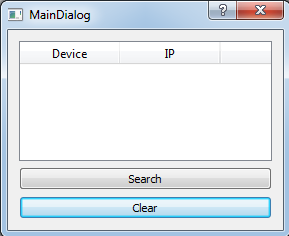
First we need a GUI so layout a GUI similiar to the one below:
Its a very simple layout (horizontal layout) with 2 buttons and a treeview.
We need 1 class for this project. Make a class called MyUDP, below is the header file.
In the dialog cpp, insert the following code#include "maindialog.h" #include "ui_maindialog.h" MainDialog::MainDialog(QWidget *parent) : QDialog(parent), ui(new Ui::MainDialog) { ui->setupUi(this); //create a UDP class udp = new MyUDP(this); /* * connect UDP on readRady to onUDPreceived * so when a reply comes in, the table with add the IP to the table * if the table does not already contain the IP */ connect(udp, SIGNAL(updateList(QString)), this, SLOT(onUDPReceived(QString))); } MainDialog::~MainDialog() { delete ui; } void MainDialog::on_btnClear_clicked() { //clear table list currentIPs.clear(); ui->tableWidget->setRowCount(0); //clear out the rows } void MainDialog::on_btnSearch_clicked() { //send UDP broadcast udp->deviceDiscover(); } void MainDialog::onUDPReceived(QString address) { //update table when new packet is received qDebug() << "Updating list"; if(!currentIPs.contains(address)){ currentIPs.append(address); int row = ui->tableWidget->rowCount(); ui->tableWidget->insertRow(row); ui->tableWidget->setItem(row, 0, new QTableWidgetItem("Pi")); ui->tableWidget->setItem(row, 1, new QTableWidgetItem(address)); } }For our classes we need a UDP object that can connect to a socket and send datagrams. Here is the header file:
#ifndef MYUDP_H #define MYUDP_H #include <QObject> #include <QDebug> #include <QUdpSocket> #include <QNetworkInterface> class MyUDP : public QObject { Q_OBJECT public: explicit MyUDP(QObject *parent = 0); void deviceDiscover(); signals: void updateList(QString IP); public slots: void readyRead(); private: QUdpSocket *socket; QHostAddress localAddress; QHostAddress bcastAddress; }; #endif // MYUDP_H#include "myudp.h" MyUDP::MyUDP(QObject *parent) : QObject(parent) { qDebug() << "Binding UDP Socket"; socket = new QUdpSocket(this); socket->bind(QHostAddress::Any, 5000); //bind to 5000 connect(socket, SIGNAL(readyRead()), this, SLOT(readyRead())); } void MyUDP::deviceDiscover(){ QByteArray data; data.append("Request"); qDebug() << "Sending broadcast"; socket->writeDatagram(data, QHostAddress::Broadcast, 5000); //broadcast from port 5000 } void MyUDP::readyRead(){ QByteArray buffer; buffer.resize(socket->pendingDatagramSize()); //var to store headers from udp QHostAddress sender; quint16 sender_port; socket->readDatagram(buffer.data(),buffer.size(), &sender, &sender_port); qDebug() << "Message from " << sender << " port " << sender_port; qDebug() << "Msg: " << buffer; if(QString(buffer).compare("PI")==0){ //add to list emit(updateList(sender.toString())); } }The main in a console application is left untouched, the main dialog becomes the main of our program.
On our Pi we need a similar structure but we only need it to respond:
#ifndef MYUDP_H #define MYUDP_H #include <QObject> #include <QUdpSocket> #include <QDebug> #include <QNetworkInterface> /* Small packets Very fast Good for multicast/broadcast Pings Unreliable, no 3-way handshake */ class MyUDP : public QObject { Q_OBJECT public: explicit MyUDP(QObject *parent = 0); signals: public slots: void readyRead(); private: QUdpSocket *socket; }; #endif // MYUDP_HAnd the CPP file:
#include "myudp.h" MyUDP::MyUDP(QObject *parent) : QObject(parent) { qDebug() << "Binding UDP Socket"; socket = new QUdpSocket(this); socket->bind(QHostAddress::Any, 5000); //bind to 5000 connect(socket, SIGNAL(readyRead()), this, SLOT(readyRead())); QByteArray data; data.append("PI"); socket->writeDatagram(data, QHostAddress::Broadcast, 5000); //broadcast from port 5000 } void MyUDP::readyRead(){ QByteArray buffer; buffer.resize(socket->pendingDatagramSize()); //var to store headers from udp QHostAddress sender; quint16 sender_port; socket->readDatagram(buffer.data(),buffer.size(), &sender, &sender_port); qDebug() << "Message from " << sender << " port " << sender_port; qDebug() << "Msg: " << buffer; if(QString(buffer).compare("Request")==0){ QByteArray data; data.append("PI"); socket->writeDatagram(data, sender, 5000); //reply back with a PI } }And finally the main:
#include <QCoreApplication> #include "myudp.h" int main(int argc, char *argv[]) { QCoreApplication a(argc, argv); MyUDP server; return a.exec(); }Now set the code to run automatically when Linux starts. I will post a tutorial of my own later but here’s a link for those who do not know how:http://dalank.com/blog/?p=368
Pi Essentials
To get started with the Pi we need some essential packages first. Open up the Pi on an HDMI monitor and run the LXTerminal. Run the following commands:
sudo apt-get update
sudo apt-get install synaptic
Open synaptic using the following command:
sudo synaptic
Search for “qtcreator” and mark the first installation package you see. This will trigger you to mark all other required packages. Install and wait.
Once Qt is fully installed, we can test it out by running
qtcreator
Note that you should not sudo IDE’s and such when running because they will put root permissions of every folder/file they create.
To ensure our project is properly working we should build a basic “Hello World” application. First we need to configure some toolchain and build root stuff.
Pretty simple: I am using the instructions from the following tutorial 🙂
http://qt-project.org/wiki/apt-get_Qt4_on_the_Raspberry_Pi
Once our toolchain is all configured properly, create a simple project!
File->New File or Project -> Qt Console Application
I just made a directory called dev in home.
Another note, most Qt apps built in any of my tutorials will be console applications (on the Pi). I planto use the Pi as an embedded device and will do most of my interfacing through SSH.
Pick your project to only for debug only, no release needed.
Here’s the basic snippet of code as a test:
 #include <QCoreApplication>
#include <QDebug>

int main(int argc, char *argv[]){
 QCoreApplication a(argc, argv);
 qDebug() << "Pi almighty";
 return a.exec();
}
Now cd into your code directory, you should see the following files
<pre>pi@raspberrypi ~/dev/hellotest $ ls
hellotest.pro hellotest.pro.user main.cpp main.cpp.autosave main.o
Run the following sequence of commands to make your code. (Yes you can do this in QtCreator but for our sake we will be building applications on a desktop and then cross compiling on the Pi itself).
qmake
make
Now we should have some goodies in our directory: run an ls and you should see an hellotest (or whatever you called your project) sitting in there, as well as a MakeFile (generated by qmake).
To run it just ./hellotest and your qDebug output should display!
And that concludes step 1 of setting up the Pi with Qt C++.
Raspberry Pi
The first project I am going to cover involves the famous (and friendly) Raspberry Pi. Now I know there a lot of tutorials out there that allow non-technical users to easily play with some “low-level” tech but I really haven’t found any that uncover the true skills required by most jobs these days. The general goal of these upcoming projects to to uncover the underlying dynamics of the Pi.
The code set that I will focus on is Qt C++ (4.8.1) until later when Qt 5 releases a much more stable build for the Pi.
I will start with the basics of setting up SSH on the PI to eliminate the need of using a monitor, keyboard and mouse to communicate with the Pi.
The next project will be to setup a network application that will allow for us to search for online raspberry pi’s and have them report back their IP’s. This will allow us to use DHCP and not worry about always figuring out what our boards IP is. Think of it as a customized “Device Discovery Protocol”.
The project after will look into writing custom GPIO drivers in C++, rather then using the python code it already comes with. I want to do this because understanding how Linux communicates with its drivers and sets hardware level components is very important for both engineers and developers. If you are not interested in this kind of stuff then you should go back to using the pre-built python libraries in the Pi that do all the heavy lifting for you.
I will think of more projects later that will involve wheels, motors, some fun sensors and much more!
If you are not comfortable with C++ or Qt please watch the video lectures below. They are very well organized and cover many key aspects of what you need to know.

